Click on the Pads icon at the top of RPCS3.
It’s suggested to create a new configuration by clicking Add Configuration
at the top right of the Pads
window.
This is so you can change configuration profiles in case you want to play games that don’t use instruments.
Follow the instructions and/or match the assignments below.
NOTES
- This is specifically for the [V3 Wii/USB Adapter WITH TILT by RetroCultMods]! Please consult your sales receipt to confirm that it is indeed a V3 Wii/USB Guitar Adapter WITH TILT by RetroCultMods.
- You can use this page for reference for V1 and V2 Wii Adapters, but you won’t have tilt.
Pad Information
Handlers | Devices |
---|---|
XInput | XInput Pad |
Device Class | Device Subtype |
---|---|
Guitar | Rock Band |
Setup
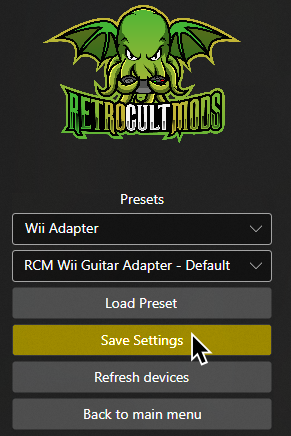
If you haven’t initlized your V3 Adapter yet, start up RetroCultMod’s Programming Tool.
In the start screen, select your Device. It will usually show up as “Raspberry Pi Pico
”.
After that, select “Wii Adapter
” or “USB Adapter
” as your Device Type
depending on what you have connected.
Then finally, set Device Variant
to RCM Wii Guitar Adapter - Default
. Rock Band 3 on RPCS3 doesn’t need need Auth, Slider, or Joystick support.
After that, click on Erase and configure
and wait for the progress bar to finish.
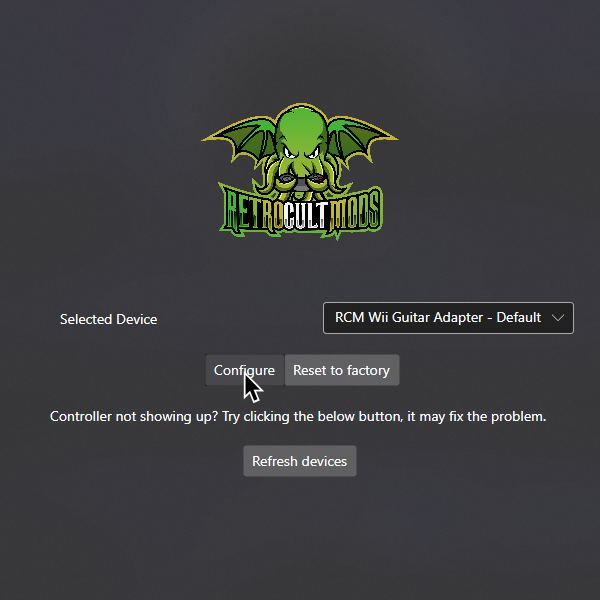
After that, or if you already have an initialized controller, click on Configure
.
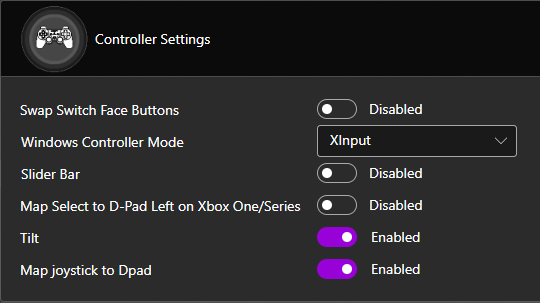
In Controller Settings, set your configuration to the following:
- Swap Switch Face Buttons: (Depends on your guitar)
- Windows Controller Mode: XInput
- Use USB Passthrough with RPCS3: Disabled
- Map Select D-Pad Left on Xbox One/Series: Disabled
- Tilt: Enabled
- Map joystick to Dpad: Enabled
It’s also suggested you calibrate your Whammy to have the best experience. Scroll down to the Wii Extension Inputs
and calibrate it.
MAKE SURE YOU CLICK ON “Save Setting"
” before closing the program or you will lose progress!
Mappings
By default, XInput has most things bound correctly. You only need to remap the following:
RPCS3 | XInput | Guitar |
---|---|---|
R1 | ![]() |
![]() |
Profile
After downloading the profile,
- Extract the .7z file.
- Drag the
input configs
folder into theconfigs
folder where you have RPCS3 in.
After that, you can select the profile in the “Pads” menu.
Most of the time, these controller profiles should work out of the box. If they don’t, try changing the controller listed in “Devices
”, next to the “Refresh
” button until it receives an input. You can edit this while the game is running.
Bindings
RPCS3 | Guitar |
---|---|
Cross | ![]() |
Circle | ![]() |
Square | ![]() |
Triangle | ![]() |
L1 | ![]() |
D-Pad: Up | ![]() |
D-Pad: Down | ![]() |
D-Pad: Left | ![]() |
D-Pad: Right | ![]() |
Right Stick: Left/Right |
![]() |
Right Stick: Up or Down |
![]() |
L2 | ![]() |
R1 | ![]() |
Start | ![]() |
Select | ![]() |
PS Button | ![]() |
Passthrough Mode
Research by [Lynxeption]
Special thanks to [@amphobius] for additional pictures